Ladybug Cake
Posted by Jayden Sepe / Stacy McKay on 20th Apr 2022
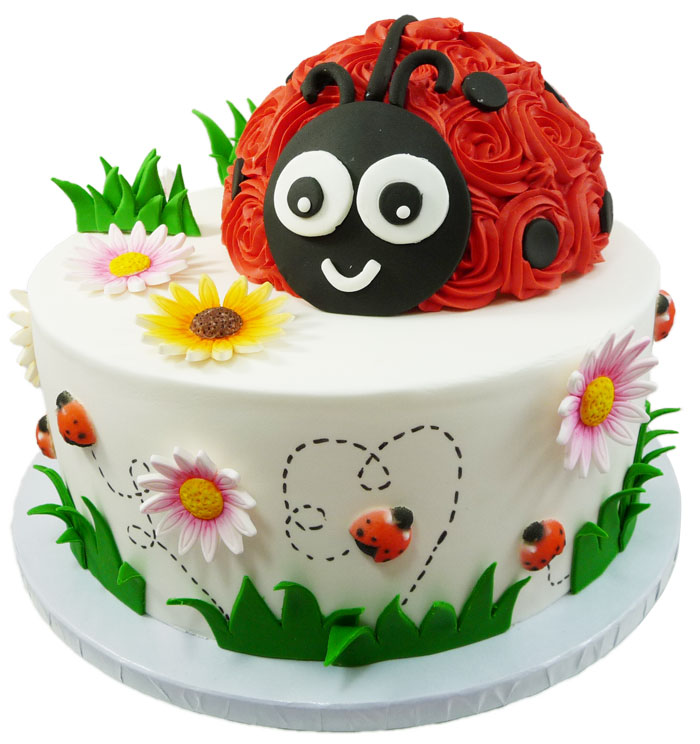
This lucky little lady bug has landed here to celebrate with you on your very special day!
Decorating Supplies Used:
- White Fondant x 2 or White Fondant x 1 ( 1 1/2 Kg is needed for this cake )
- Green Fondant 2 Lb
- Black Fondant 8 oz
- Fondant Wheel Cutter
- Pen Blade
- Lady Bug Pressed Sugars
- Sunflower/Daisy Plungers
- Flower Forming Cups
- CMC Powder
- Roxy & Rich Vibrant Orange
- Roxy & Rich Sunflower
- Roxy & Rich Hot Pink
- Roxy & Rich Candy Pink
- Roxy & Rich Cocoa
- Paint Brush
- Hemisphere 6 1/2” Cake Pan
- Americolor Super Red ¾ oz
- Americolor Black Pen
- Ateco Tip # 822
- Piping Bag 12” & 18”
- 10"x 2"Cake Round Pan
- Melting Chocolate
- Cake Board Drum 13”
- Cake Board 6” thin
How to Decorate Your Lady Bug Cake:
Step 1:
About a week in advance start to make your daisies and standing grass so that they have time to dry. In a small ball of white fondant (about 1 cup) sprinkle and kneed in about a tsp of CMC powder. The CMC powder will add elasticity to the fondant and allow it to harden properly. Roll out a small amount of the fondant until it is about 1/8” thickness. Cover the fondant not being used in saran wrap and a Ziploc bag.
Using your sunflower/daisy plunger cutters create several different sizes of daisies and place in the flower forming cups to dry. Cut extra daisies in case any break while you are placing them on the cake. Set aside to dry for two - three days on your counter.
Take some green fondant and roll it out to about 1/8” thickness and using the CMC powder like you did above for the daisies, kneed that into the green fondant. Using the pen blade, free hand cut grass in a tall height, medium height and small height and let harden. Cut extra pieces in case any break while you are placing them together. Lay them on parchment paper on your counter to dry. You can add dimensions by “curling” up some of the blades for a more realistic look. Set aside to dry for two – three days.
Step 2:
Collect one piece of the tall, medium, and small height grass pieces. “Glue” them together with a toothpick in a layering format – with the tallest at the back. The “glue” can be made with a small amount of water and CMC powder mixed together. Set aside to dry.
Now its time to “shade” your daisies. Using the Roxy and Rich petal dusts and a paintbrush you can start shading. For the smaller daisy start from the center out shading with the Candy Pink to the edges of each petal. Then shade with the Hot Pink near the center only for a contrasting color. Finally using the Sunflower petal dust - color the center of the daisy.
For the larger daisies use Sunflower petal dust start shading with daisy from the center out using the sunflower petal dust and shade around the center with the Vibrant Orange petal dust. Then finish the center using the Cocoa Brown petal dust. Set aside until you are adding the finishing details.
Step 3:
Once you bake and cool the cakes cover in white fondant – you can do this approx. 3 days in advance of the function. Cut out more “grass” pieces by free hand and place randomly around the bottom of the cake. You can “glue” them to the side of the cake with a small amount of melted chocolate. Have some fun and pull down some of the strands for a more realistic look.
Step 4:
Place your finished daisies around the side of the cake using a bit of melted chocolate as your “glue”. Then place the lady bug pressed sugars around randomly on the side of the cake with melted chocolate. Have some fun using the black Americolor writing pen to draw the lady bug flying trails for each lady bug pressed sugar that you add to the side of the cake.
Step 5:
Color 2 cups or buttercream icing red using the Americolor super red gel and placea small dab of icing on the thin 6” cake board. Place the baked and cooled hemisphere cake onto the thin board and then onto the top of the cake. Using tip # 822 pipe red buttercream icing rosettes around the small cake for your lady bug.
Roll out a small amount of black fondant and cut out small circles for the spots and one larger circle for the lady bug face. Roll out a small amount of white and cut our circles for the ladybug eyes and place on the larger black fondant circle with a small amount of CMC ‘glue. Then using two small black circles place those on the white circles with a small amount of CMC “glue”. Then place two more tiny circles on top of the smaller black circles to create the pupils. Roll a small mouth with white fondant and place on with CMC “glue”. Then roll two small black fondant pieces for the antennas and a longer one for line down the center of the back.
Step 6:
Finishing the top of the cake off by add your standing grass- inserting the toothpicks into the top at random. Add a few of your extra daisies and your cute ladybug cake is complete!


Jayden Sepe, owner of Scoop-n-Save, professional cake artist and sprinkle aficionado enjoys helping people develop their cake decorating super powers. Jayden studied culinary arts with a specialty in baking and pastry at the Pacific Institute of Culinary Arts and went on to open Forbbiden Sweets where she wowed supplying creative cakes, cupcakes and cookies. Since taking over at the Scoop, Jayden has indulged her shopping addiction to bring new and trending decorating products into the store.


